Intro
This week, after trying to upgrade our project from Unreal 5.6.1 to 5.7.4 and discovering yet again that as well as fixing some bugs that were impacting us, 5.7 introduced a whole new, thornier bug - breaking bundled PSOs which I’d only recently added and did not want to lose.
Rant: feel free to skip
Unreal is great but it really, really needs an LTS version where bugs are just…fixed. Far too often, fixes for quite serious bugs are just left to the next main point release and not backported, and the new point release introduces new serious bugs itself! It’s a conveyor belt of shame at this point. To illustrate:
- UE 5.4 broke String tables (this one was at least fixed within the 5.4.x branch but 2 patches later)
- UE 5.5 broke skeletal animation when occlusion culling was turned off (not fixed until 5.6)
- UE 5.6 broke GPU ribbon particles on AMD cards (not fixed until 5.7)
- UE 5.7 broke bundled PSOs (not sure if fixed yet, but wasn’t in 5.7.4)
This is getting a bit silly now. If I was a dev manager at Epic I wouldn’t be feeling good about that recent track record, these are pretty significant bugs. I’ve found the fixes were easy to backport so they could have fixed them in a patch release, but chose not to spend the time to do so.
I get it, it’s a “free” engine (except if you make a ton of money), but on principle it’s quite poor.
Luckily, we can build Unreal Engine from source and cherry-pick changes ourselves, to avoid having to take broken changes just to get fixes we want. I’m at the stage where I’m not really using the new features they’re adding to UE now, so there’s no point in updating anymore except for bug fixes. I realise I might have more problems later with say console SDKs needing updated versions, but that’s something that I’ll deal with later - right now we just need stability so we can get on with making a game instead of messing about with this nonsense.
However, while following this process I came across a few things that were not covered in any of the docs or other blog posts I read to get up to speed, so I’m going to document my whole process here.
This is a Windows-centric post because that’s my platform, but as I understand it the process is much the same on other platforms, changing
.batto.shand\to/being the main changes.
The steps here reflect what I had to do in May 2026 to get a source build of the Unreal 5.6 branch to work. If you’re following this later, or with another branch, it may not be exactly the same, but hopefully this post fills some gaps if you come across similar problems.
The Goals
Let’s first define my goals. I wanted:
- A source build of Unreal that I, a C++ developer, could modify directly while working on the game. No sepaarate build process required.
- To use Rider as my main dev tool still (not Visual Studio)
- To not clone more of the UE project history than I needed to
- To generate installable builds that I could give to artists
- To keep the game project the same between dev machines and artist machines (same .uproject settings)
Spoiler: all these were achievable.
The official docs are here if you want to refer to them, but since I didn’t want to use Visual Studio, or load the UE5.sln in its entirety, I’ve deviated.
Step 1: Fork & Clone
Since we’re going to be making changes to the UE source code, we need a fork to track those changes properly. So my first step was to create a fresh fork of the Unreal Engine project on GitHub. I had one already but it was super old; if you just use the “Sync Fork” option in GitHub it won’t pull across all the new branches, so the simplest solution was to delete my existing fork, and fork it again. It’s this fork that I then cloned, for simplicity.
I didn’t want to clone the fork in full though, because the repo is huge. I wanted history only for 2 branches; 5.6 which is my base, and 5.7 which
had the fixes which I wanted to cherry-pick. Git can do this via shallow clones.
The “typical” way is to use the --depth N parameter, which keeps only the last N commits, but I wanted to be more nuanced.
I really wanted all the history for the branches I was interested in, but not the others (UE has a lot of duplicated commits
in dev branches because of the way they integrate from Perforce)
I used this sequence:
git clone --single-branch --branch=5.6 YOUR_FORK_URL UnrealSource
cd UnrealSource
git remote set-branches origin 5.7
git fetch
For me this was enough of a trimming down and was easier than picking an arbitrary number of commits. I can see the full history of the 5.6 branch, and also all the commits that went into 5.7 so I can cherry-pick. Later on I might need to add 5.8 if I need future changes but for now this is fine.
If you want to limit the history further, you might also
want to investigate --shallow-since if you want to cut this down further, but I haven’t tried this.
Note: you will still need an Epic Launcher-installed version of Unreal at the same major version your source version is based on. This is because a launcher engine is the easiest way to install plugins from Fab, and you’ll also need a couple of other things from this launcher build to patch up gaps in the dependencies the Setup doesn’t handle properly.
Step 2: Setup.bat
Cloning only gives us the source code which we actually build; there are a few binary dependencies which we have to pull down. However, we don’t need as many as the default wants to pull, so we’ll narrow it down. Credit to twevs for this info.
cd UnrealSource
Setup.bat -exclude=WinRT -exclude=Mac -exclude=MacOS -exclude=MacOSX -exclude=osx -exclude=osx64 -exclude=osx32 -exclude=Android -exclude=IOS -exclude=TVOS -exclude=Linux -exclude=Linux32 -exclude=Linux64 -exclude=linux_x64 -exclude=HTML5 -exclude=PS4 -exclude=XboxOne -exclude=Switch -exclude=Dingo -exclude=Win32 -exclude=GoogleVR -exclude=GoogleTest -exclude=LeapMotion -exclude=HoloLens
Copy missing GoogleTest stuff
Even though we’ve told Setup to not use GoogleTest, the build actually still tries to access it. I fixed this by
copying what it needed from the Launcher build 🙄
Copy the folder LauncherEnginePath\Engine\Source\ThirdParty\GoogleTest into the same location in your source build.
Copy missing IOS stuff
Same deal, even though we’re telling the build not to use IOS, parts of the scripts still expect some files to be available. This is very annoying but apparently necessary:
- Copy the folder
LauncherEnginePath\Engine\Source\Programs\AutomationTool\IOS\Resourcesto the same location in your source build. - Copy
BouncyCastle.Crypto.dllfromLauncherEnginePath\Engine\Binaries\ThirdParty\IOSinto the same location in your source build
Step 3: Edit Build.version
Unreal usually generates a unique BuildId every time you build, which is stamped into every module and used to check whether all the modules are from the same build. Any deviation will result in a prompt to re-build those modules when you start the editor.
Multiple people advise overriding this to a fixed BuildId instead, and just controlling the compatibility yourself. I think that so long as you always build everything together from source, including Fab plugins, this is the simpler way to do it; but it’s important that you don’t accidentally mix binaries from different builds.
The file which controls all this is UnrealSource\Engine\Build\Build.version. You want to make these changes:
- Add
"BuildId": "YOUR_CUSTOM_BUILDID_STRING"- whatever you want really but maybe increment it when you roll out new builds to others - Change
"CompatibleChangelist": 0 - Change
"IsLicenseeVersion": 1,
For example, here’s ours:
{
	"BuildId": "OD-UE5.6.1",
	"MajorVersion": 5,
	"MinorVersion": 6,
	"PatchVersion": 1,
	"Changelist": 0,
	"CompatibleChangelist": 0,
	"IsLicenseeVersion": 1,
	"IsPromotedBuild": 0,
	"BranchName": "UE5"
}
Step 4: Copy & Modify Fab Engine Plugins
Any plugins you have bought from Fab need to be migrated into your new source engine folder, because they also need to be built with this same BuildId. You could put them in your game’s plugins folder instead if you wanted, but I’m assuming you want to have them generally available in the custom engine build.
You need to have the Epic Launcher version of the same major version of the engine you’re basing the source on to copy Fab plugins from.
- Copy the entire
Marketplacefolder fromLauncherEnginePath\Engine\PluginstoUnrealSource\Engine\Plugins - Edit every
.upluginfile in every subfolder ofUnrealSource\Engine\Plugins\Marketplacein a text editor, and delete the line that says"EngineVersion" : "5.6.0"or similar
The second point will just prevent the editor warning you that the plugin was designed for a different version at startup.
Step 5: Linking Your Game To The Source Engine
The official documentation and lots of other blogs will tell you to put your game folder directly under the UnrealSource root folder. Having tried multiple options, I don’t recommend this route.
The reason is that if you embed your game project inside the engine source, you need to change the EngineAssociation
entry in your game’s .uproject to a blank string (""). This is fine for C++ devs, but it’s inconvenient for artists
and Blueprint-only folks, who are much better off with an installed version of the engine, separate from game projects.
So in order to keep the contents of the .uproject consistent between both those camps, you want to set EngineAssociation
to an identifier which locates the engine wherever it is in the filesystem. For C++ devs, that can point at a source
version, but for artists it can point at a binary installed version.
The easiest way to register your source folder so it can be located is to run UnrealVersionSelector-Win64-Shipping.exe
in UnrealSource\Engine\Binaries\Win64 and answer “Yes” when asked whether to register this source folder.
By default this associates a GUID with the source folder, but I prefer to give it a nicer name so it’s easier to set up on artists machines later.
- Open Regedit
- Navigate to
HKEY_CURRENT_USER\Software\Epic Games\Unreal Engine\Builds - Right-click the GUID which has the Data value set to your UnrealSource folder, and select Rename
- Call it anything you want. For example here’s ours:
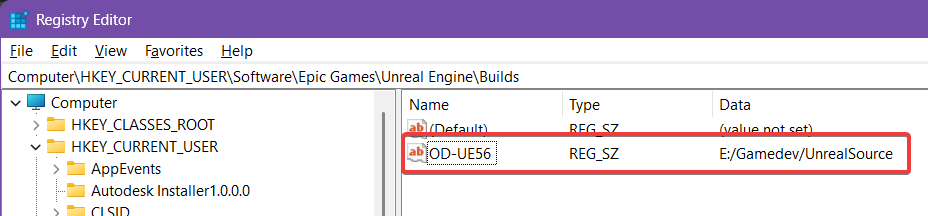
Now that you’ve done this, you can associate your game project, wherever it lives, with the Unreal source install.
You can manually edit the .uproject to set its EngineAssociation to the name you used in the registry
(in our case "OD-UE56"), or you can right-click on the .uproject, click “Switch Unreal Engine Version”, and pick
“Source build at PATH”. I tend to do the former because I use Rider so don’t need solution files to be generated.
Step 6: Building the engine from your game
You might have spotted that we haven’t actually built anything yet. While we could follow the official instructions and
use GenerateProjectFiles.bat, which generates a UE5.sln project, that’s not how we’re going to do it. We’ve associated
the source of the engine with our game now, in its independent location, so we can actually just build the engine as
a side-effect of building our game! This has the advantage of only building what we need.
Opening your game uproject in Rider now will load everything you need - building your game project in Development Editor mode for example will build the engine source as well. You can then use your engine-source-enabled game project to code just as you did before against a launcher install, except now you can modify any of the engine source you want, and it’ll recompile as needed just like your own code.
BUT!! the first time, it will try to install the RiderLink plugin, and will probably fail. The AutomationTool will have thrown an error (in the Build > RiderLink Install section) with a link to the full detailed log. The main error I found was that there were .Net packages with known vulnerabilities, which we need to fix before it’ll let us use them.
Fix outdated .Net packages
The error log mentioned in the build output should show you errors relating to vulnerabilities, usually linking the CVE security avisory (Example). Luckily, updating the packages is relatively simple.
- Find the .csproj which includes the package reference which has vulnerabilities. For example, search for “Microsoft.Build” and find this line:
<PackageReference Include="Microsoft.Build" Version="17.11.4" ExcludeAssets="runtime" />
- Change the
Version=field to a newer version which doesn’t have the vulnerability, as described in the advisory, e.g.
<PackageReference Include="Microsoft.Build" Version="17.11.48" ExcludeAssets="runtime" />
Fix all of these, and re-open Rider. Click on the Build log and the RiderLink install tab, and ensure that it completes this time. While RiderLink isn’t strictly necessary, without it you can’t use Live Coding from inside Rider or see any of the UE logs while debugging. And the fact that the AutomationTool is broken will cause you other problems later, so best to fix now.
Step 7: Creating Installed Builds
Warning: for some reason after creating an installed build, it makes your own game build re-build the engine again. You need plenty of time to do this anyway, but just remember there’s an extra long normal game build waiting for you afterwards, as a treat 😜
So this is all fine for C++ developers, who can build both the engine and the game at the same time. But what about artists, or Blueprint-only developers? We’re going to need to package up an installed build of our custom UE version for them to use.
There is a specific target for this you can fire off with RunUAT, as follows (alter your path to the UnrealSource directory
as needed):
C:\UnrealSource\Engine\Build\BatchFiles\RunUAT.bat BuildGraph -target="Make Installed Build Win64" -script="Engine/Build/InstalledEngineBuild.xml" -set:HostPlatformOnly=true -set:WithDDC=false
This takes a long time! The build alone takes about 3x as long as just building the engine for your game in Development Editor mode. And if it fails, it might fail near the end (it’ll pick up Shipping-only bugs in plugins which might have gone unnoticed). So be prepared for a long wait.
The -set:WithDDC=false option seems to be really important to keep the build time sane though. If you don’t specify that, it
spends literal hours building all the derived data caches for all the templates and sample assets. The pre-built installs
created by Epic don’t seem to have these anyway, so it seems best to exclude them.
Once the process has finished, your installable engine build will be in UnrealSource\LocalBuilds\Engine\Windows.
You need to zip up the contents of that folder and give it to people. It includes a lot of large PDB files
(debug symbols) that they probably don’t need so you can exclude those. For example using 7zip:
cd LocalBuilds\Engine\Windows
7z a -r -xr!*.pdb C:\YourBuildOutputFolder\UnrealSourceBuild_20260528.zip .
This takes the installed engine down to about 30GB (15GB compressed).
If you omit
-set:WithDDC=falsethen it actually puts the engine install inUnrealSource\LocalBuilds\InstalledDDCinstead.
Step 9: Installing Builds
So now we need to install and register this build on the artist’s, or Blueprint developer’s machine.
Note: I’m still working on the basis that we’re installing the engine build separately to the game build. For us this just makes more sense because the game is changing all the time, and I’ll be changing Unreal rarely. If you wanted to run a more unified build where you give these people both the engine and the game pre-built together, then you probably want to embed the game within the engine like other docs recommend. But this way, we can do game builds separately and the custom engine build can remain mostly static (and re-usable across multiple projects / working copies).
- On the other person’s machine, unzip the archive you created in the previous step
- Open Regedit
- Navigate to
HKEY_CURRENT_USER\Software\Epic Games\Unreal Engine - If there’s no
Buildskey already there, right-click on Unreal Engine and click New > Key, call itBuilds - Right-click the whitespace inside
Builds, pick New > String Value - Name this the same as what you set
EngineAssociationto in your game’s.uproject(in my case"OD-UE56") - Right-click the new value and click “Modify” (or double-click it)
- In the value field, enter the root directory of the build you extracted (no trailing
\) e.g.C:\UnrealSource
It should basically look the same as it does on your machine, except pointing at the installed build instead of your UnrealSource folder.
You can tell that this has worked by right-clicking on any
.uproject, clicking “Switch Unreal Engine Version” and checking the list of versions available. There should be an entry called “Binary build at C:\UNZIPPED_BUILD_FOLDER”
Now, double-clicking on a .uproject that has your build name in EngineAssociation will automatically open this
build of the engine. In our case it’s "OD-UE56" and on Marie’s machine it opens this custom installed build, and on
mine it opens my source build. Perfect!
Fin
That’s basically it! I hope this helps someone, I found the available info online to be rather fragmented and missed a bunch of new problems (like the .Net package updates), and also didn’t really talk about the why elements of locating your game project under the source engine build or not. So this is my attempt to improve that somewhat.
At the very least it will help me in a few months when I can’t remember any of this 😜